

Fenglin High Speed Camera Main Window
(1) Double click the "High Speed Camera" shortcut on the desktop to open the main window of the application software, or click "Start Menu ->All Programs ->High Speed Camera ->High Speed Camera" in sequence.
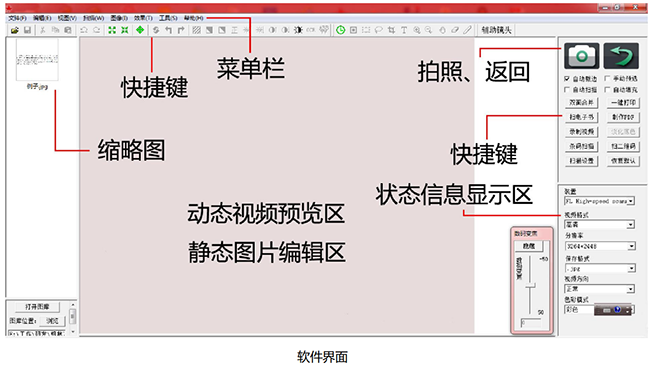
The interface of this software mainly consists of: menu bar, shortcut key toolbar, photo return hotkey bar, status information display area, thumbnail list view area, dynamic video preview area, static image editing area, etc., as shown in the above figure.
menu bar
Untitled 2.png
All the functions of this software can be found in the menu bar, which consolidates the functions of the software.
Shortcut Key Toolbar
The shortcut key toolbar displays commonly used functions in the menu bar in the form of shortcut icons, making it convenient for users to operate.
Take a photo and return to the hotkey bar
Click on the camera icon to take a photo and scan it. Double click on the thumbnail to edit the static image, and then click on the return icon to switch to dynamic shooting mode.
Status information prompt bar
The information prompt bar is used to display prompt information about software operations and software running status.
Thumbnail List View Area
Display the images in the current settings directory (customizable number of images displayed), making it convenient for users to preview, open, and delete management operations.
Dynamic video preview area
Display the dynamic range and effect that the scanning device can scan.
Static image editing display area
Display the actual effect after image processing.
Menu bar description
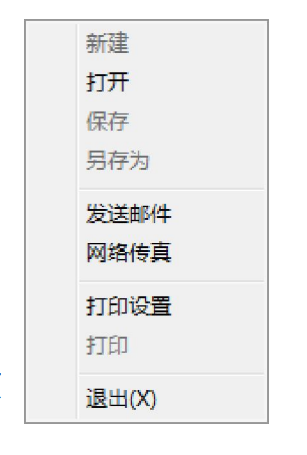
1.1 File Menu
The file menu is mainly used to operate existing files, including: create, open, save, save as, send email, network fax, print settings, print, and exit functions.
newly built
Create a blank image editing area where you can paste and edit images.
Open the saved images on the computer for various image editing, and the image format must be in a format supported by this software, otherwise it cannot be opened.
save
After performing various operations on the images in the current image editing view, save the resulting images with the same file name, file format, and file path as before.
save as
After performing various operations on the images in the current editing view, the resulting images can be attached and saved. The file name, file format, and file path of the images can be modified.
send mail
Open the webpage for users to use email, making it convenient for them to send emails. Before using this feature, users must set up the email address.
Print Settings
Open the printer settings function already installed on this computer, which should be set before printing preview and printing.
print
After completing various operations on the images in the current image editing view, you can print the resulting images in the printer. After selecting this menu, a printer settings dialog box will pop up. After selecting the printer, click the "OK" button to print the images (printing a full page image is necessary to ensure 1:1 or selecting "Print Fill" to ensure 1:1 printing after taking photos).
exit
After using this software, this menu allows you to exit the software directly.
2.2 Edit Menu Book
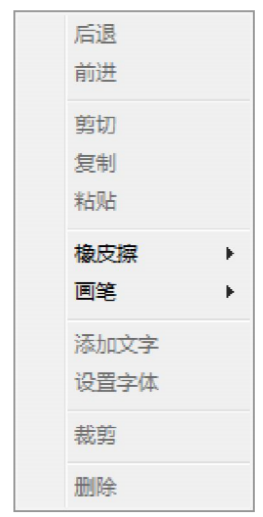
The main functions provided by the menu include: back, forward, cut, copy, paste, eraser, brush, add text, set font, crop, and delete functions.
retreat
When dissatisfied with the previous step or steps of image editing, you can return to the previous step or steps by going back. Note: This menu is grayed out 11 times before any operation has been performed on the current image, indicating that no operation has been performed on the current image and the back function cannot be used. The maximum number of back steps is 8 times.
forward
This function is the opposite of the backward action. After performing the backward operation, users can use the forward to restore the backward operation of the next step. The number of steps taken forward is associated with the number of steps taken backward.
cut
After selecting the entire or partial frame of the image, the selected content can be clipped and pasted later.
copy
Copy the entire image or a selected part of the image.
paste
Paste the cut and copied content in the image editing area.
eraser
The eraser can erase image information, and there are four selectable diameters for erasing: 1X, 5X, 10X, and 50X.
painting brush
The function of a paintbrush is to draw various colored markers, lines, and so on on on an image.
Add Text
This tool can add some text to the current image. After selecting this menu, click the left mouse button in the image editing area where you want to add text to start adding text. After entering the text you want to add, click the left mouse button outside the added text to complete the addition.
set font
Set the font color and other information for adding text.
Cropping
After selecting the image content, you can remove the content outside the selection box and only keep the content inside the selection box. This function is reversed from cutting.
delete
Delete the entire image currently open.
2.3 View Menu
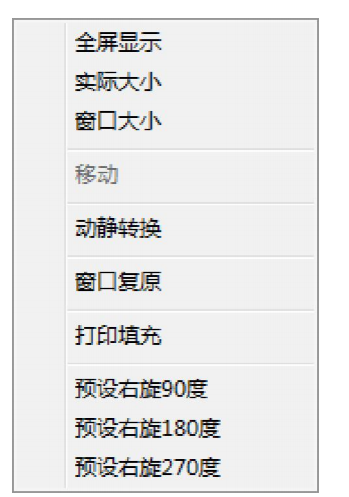
This menu bar is mainly used to change various display characteristics in the current view, making it convenient for users to perform various operations. The content includes: full screen display, actual size, window size, movement, dynamic and static conversion, window restoration, print fill, preset right rotation 90 degrees, preset right rotation 180 degrees, preset right rotation 270 degrees.
Full screen display
On the computer screen, only the dynamic and static image areas are displayed, which hides the toolbar, status bar, and taskbar.
Actual size
Display according to the actual size range of dynamic and static images.
window size
Scale the actual size range of dynamic and static images according to the window and display them in the editing area of the software interface.
move
If the size of the current image display exceeds the display range, you can use this tool to move the image to display other parts of the image. After selecting this tool, you can hold down the left mouse button and drag in the image display area.
Dynamic and Static Conversion
Dynamic to static conversion is the process of switching between a dynamic video preview view and a static image editing view.
Window restoration
Restore the closed toolbar of the interface to its default state.
Print Fill
After selecting "Print Fill", the software will automatically calculate a white background image as the background for each photo taken, and paste it onto the captured image for easy 1:1 printing in later stages.
Preset right rotation of 90 degrees
Check this option, and the scanned image will be rotated 90 degrees to the right before being displayed and saved.
Preset 180 degrees right rotation
Check this option, and the scanned image will be rotated 180 degrees to the right before being displayed and saved.
Preset 270 degrees right rotation
Check this option, and the scanned image will be adjusted 270 degrees to the right before being displayed and saved.
2.4 Scan Menu
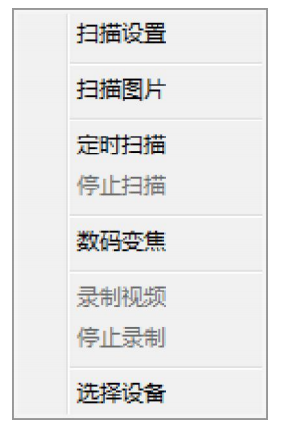
This menu bar is mainly used to operate the scanning function of dynamic images. This includes menus for scanning settings, scanning images, timed scanning, stop scanning, digital zoom, recording videos, stop recording, selecting devices, and other functions.
Scan Settings
The main function is to set and modify information such as image size, image status, image format, image naming, automatic black and white image (binarization), automatic background color removal, automatic time addition, automatic grayscale image, timed continuous shooting interval, JPG save quality (KB size adjustment), save path, etc. Among them, automatic black and white image (binarization) and automatic background color removal can enable preview. After selecting this menu, a dialog box will pop up.
Scan images
Scan the images in the current dynamic video view, resulting in an image file that is automatically displayed in thumbnail form on the image list view for easy viewing by users. Perform a scanning operation at regular intervals, and the specific time interval can be set in the scanning settings dialog box.
Stop scanning
After starting the timed continuous shooting, you can stop the timed continuous shooting. Digital zoom can enlarge dynamic images locally through digital zoom, with a total magnification of 1-200 times.
record video
Record images in dynamic video views and save them in video format. Stop Recording After starting the recording, if you want to end the recording, you can click this button to stop recording and store it on your computer.
Select device
Select the video device currently connected to the computer.
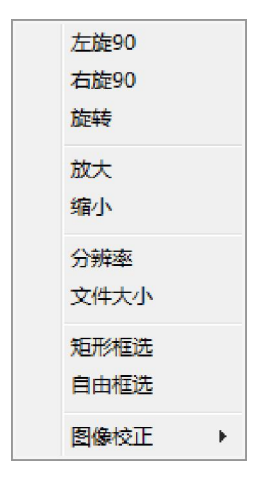
2.5 Image Menu
This menu bar is mainly used for various image processing of the current image. For detailed content, please refer to the menu items of each function.
Left turn 90
Rotate the current image counterclockwise by 90 degrees.
Right turn 90
Rotate the current image clockwise by 90 degrees.
rotate
Rotate the angle of the current image, and the rotation angle can be customized by the user; After clicking on this menu, a dialog box will pop up where users can enter the degree of rotation (each time a new angle is entered, the image rotation angle will be automatically previewed). If you want to maintain the original size, check the option to keep the image size unchanged. After setting, select "OK" to achieve image rotation.
amplify
Enlarge and display the current image proportionally.
reduce
Reduce the current image proportionally for display.
resolution
Change the actual resolution size of the current image; After selecting this menu item, a dialog box for changing image size will pop up. Users can choose to change the scale factor or directly input the width and height of the image to modify the new resolution.
file size
Adjust the quality of the captured image, and the KB count will change after adjustment. It is recommended to adjust it to 60%.
Rectangular Box Selection
You can draw a rectangular checkbox on the current image. After selecting this menu, hold down the left mouse button to move and select the rectangular area you want to choose. Release the left mouse button, and the selected part will be inside the rectangular box.
Free Box Selection
This tool allows for partial irregular selection of the current image. After selecting this tool, you can hold down the left mouse button and move it. When you release the left mouse button, a closed selection box will automatically form, with the selected image range inside the box.
image correction
Perform gamma and color correction on the image.